Great Resources for 3D Modeling & Website Design

Work In Progress / 13 January 2023

3D Studio

Maxtools - 3D Studio Scripts

MASTERING AUTODESK 3DS MAX 2013 - Dowloadable PDF

Physically Based - A database of physically based values for CG artists

THE PBR GUIDE - PART 1

FreeConvert - An online Video Converter

Clara.io - 3D Model Library

PureRef - Excellent FREE tool for capturing reference images for modeling

xNormal - Bakes Your Maps

Texture Generator Online

Seamless Texture Geberator

Normal Map Online - GamesFromScrach - Excellent resource

Texture Maps Explained - Essential for All Texture Artists : FlippedNormals

SCRIPTSPOT - 3D Studio Scripts and more

Texttools - Excellent 3D Studio plugin

Floor Generator - 3D Studio Plugin

Preview: Camera Mapping to Clipboard (TexTools 3.0)

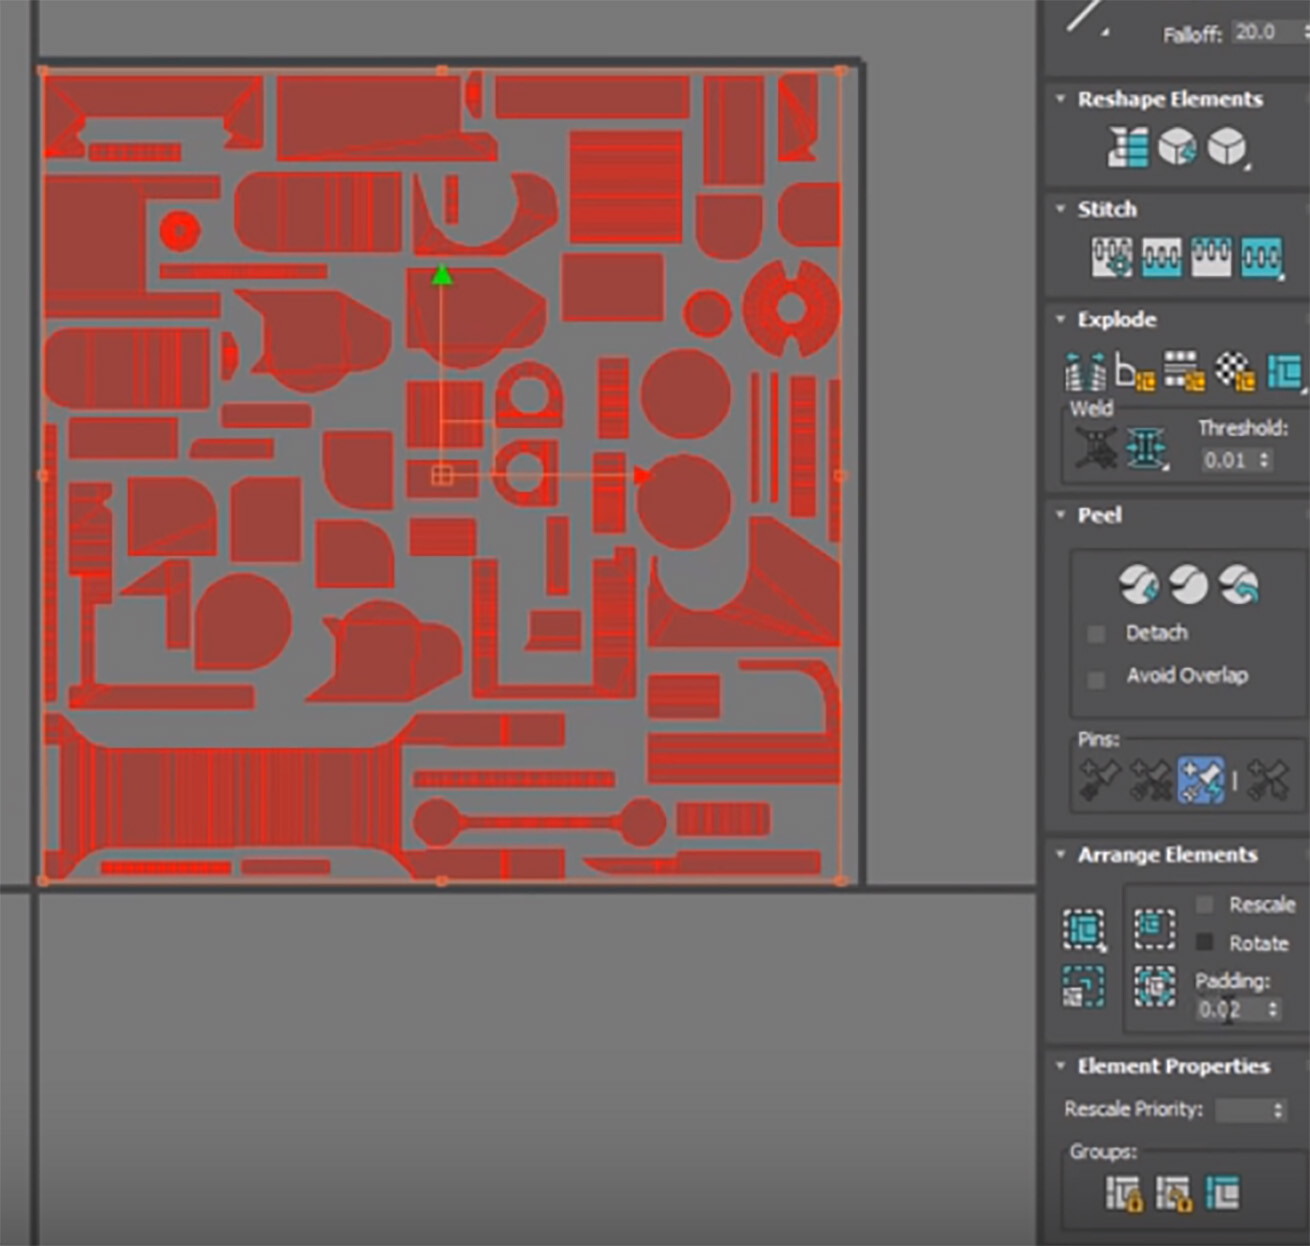
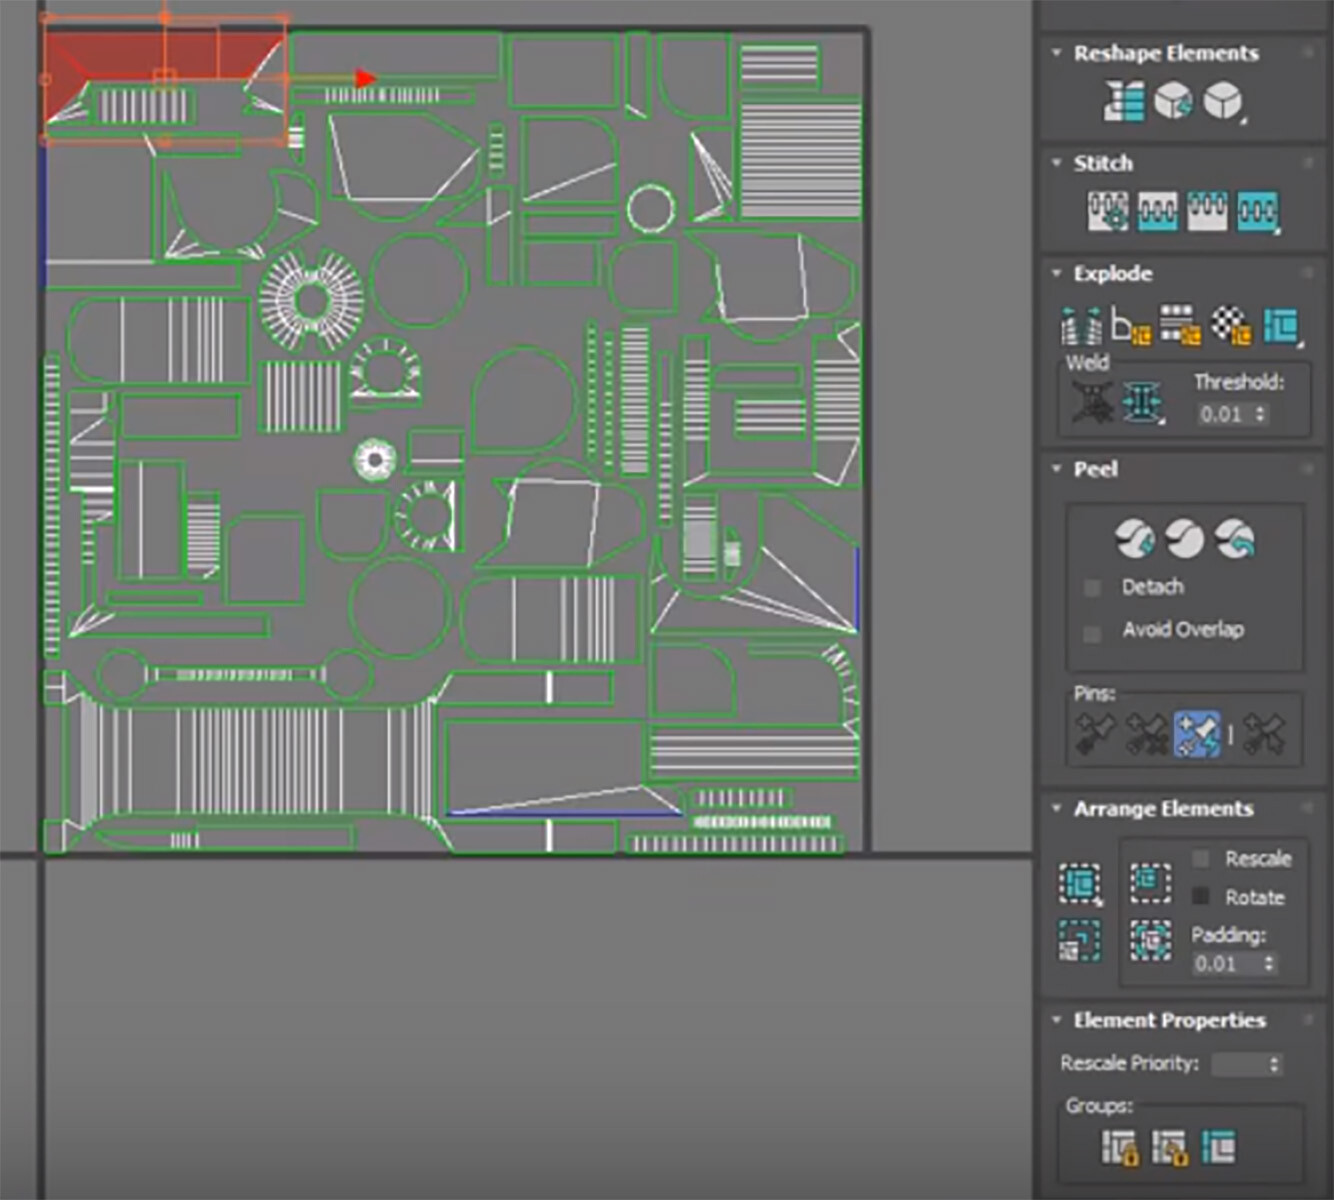
TexTools is a collection of UV and Texture related scripts for 3dsmax 9 and up that can be very easily installed. It was initially started to improve my personal workflow of UV-editing and Texture previewing in 3dsmax. Eventually I ended up creating scripts that other UV tools can not do or do not yet provide.

When using TexTools you will see a Toolbox inside the GUI of 3dsmax. Most functions only work if you are in the editUVW mode in 3dsmax (unwrap UVW modifier and then the edit button).

Fraction-Decimal-Millimeters


RECREATING REAL WORLD MATERIALS FOR SUPERIOR VISULAIZATION
AUTODESK UNIVERSITY 2008 by Pierre-Felix BretonDownload Article - coming soon

Photopea - Free online Photoshop like photoeditor

Gradient - Really Cool gradient making website to use for Photoshop or web

Figma - Great resource collector and prototyping web browser application

Material Icons - Material symbols and icons

Microstock Keyword Tool - As the link explaings.  Helps with creating keywords

Asteroom - World-Class 3D Tours made simple

Materialize - Free to Use Texture Creature (Height, Diffuse, Normal, Metalic, Smoothness, Edge, AO, maps)

Lorem Ipsum - Text generation website.  Great for Website prototyping

Typescale - Great for website design - Web Design

Google Material Symbols - Fonts & icons- Web Design

UI Goodies - Website UI Design Tools

Color Phsycology - Learn the phsycology & theory of colors

Adobe Color Wheel - Complimentatry color, retrieve color from uploaded images etc.

Font Awesome - Lots of Website icons, 

File Resolutions

8K - 7680 X 4320
4K - 3840 X 2160
2.5K - 2304 X 1296
2K - 2560 X 1440

FULL HD- 1920X1080

Report

Materials & Texturing in 3D Studio Max

Article / 13 January 2023

Using Max’s Slate Material Editor

3DS Max - Projection Unwrap Tutorial
Source: BitHalo

Opacity Maps
White = Opaque (100%) fill
Black = Transparent

Black Image with White Dots

 Bump dots black & white

Bump Maps
White = depth
Black = Height

White areas transparent
 
Result

Metallic Map
Determines areas that are metal or not

White = Metals Parts
Black = Non-Metal

Rust is not considered metal.  If it conducts electricity then it is

Texture Tip for UV Mapping in Photoshop
source: deepfriedectoplasm

Bump Map Parameters


Creating Seamless Textures in Photoshop

Youtube Video

  • Choose canvas size.

  • Create a document 1000x1000 pixels

  • Position texture where you want it to display

  • Rasterize layer

  • Then Crop your layer

  • Then select Filter, other offset (This will reflect image back onto itself)

  • Make offsets, half size of your document, then select ok

  • Zoom in to locate seem, this offset basically places all the edges to the center of the image

  • Now blend the middle cross to make this seamless

  • Use Spotting Healing Brush, and click on the crease to fix

  • Patch Tool also good option


Report

3D Studio UV Mapping Basics

General / 08 January 2023

Basic Textures needed for Mapping - 2k Resolution

  1. Roughness map
  2. Normal map
  3. Metallic map

A great source fo textures Textureize

Textures when scaling always follow the POWER OF 2 RULE

An excellent resource, view his video linked below:

Unwrap Special - Full guide to efficient and fast UV Mapping - 3Ds Max 2017

Subscribe to his youtube channel.  All resources below I learned from his video.

Avoid hard edges in UV Islands.  Each island represents 1 smoothing group
Want to make sure all island are as straight and smooth as possible.  You don't need to do this but is for greater results, especially if someone is paying for the work.

Some great commannds to use

Use AutoSmooth for smoothing group, the Flatten My Smoothing Group

Use Peel Mode to fix any issues with scaling or scewing

Use re-scale elements button to even out all UVs

Use Grow Selection to select more faces or edges

If Peel Mode makes a huge mess by overlapping everything- use Pack Custom button

Quick Planar Button is good for making quick islands

Convert Edge Selection to Seams makes the selected areas a UV seam.

To pack all the individual parts UV Maps do the following:

  • Collapse all selected object.  
  • Then select all the UVs and hit re scale elements.  
  • Then you select the huge mess of UVs.
  • This places all the UVs within the correct space

If there is too much padding, you can fix that by changing the
Padding option to like 0.01 from 0.02, the Pack Normalize again.

This packs everything tighter and allows us more resolution.  
Scale the islands you are not going to see down and repack normalize again,
to re-pack UV and this will again improve our resolution.

 One last thing we need to do is assign a smoothing group to each island again.

TEXT TOOLS

In TexTools, select smoothing groups from UV shells

Here is another great youtube resource.  Make sure you subscribe to get all the latest updates.  Modeling UV unwrapping and Texturing a Fuel Tank in 3Ds Max

To unwrap a object by default, use “Mapping”, Flatten image.
Default are normally good enough

Defaults:

The defaulted result:

To export the map to Photoshop do the following:

  • Click on Tools, Render UVW Template

For games, stick with a power of 2 for UV map size

A window like below will open


 Edit UVW’s Window - Options

Save Current Settings As default - Good for maintaining settings you have changed to always open up.

When saving UV wires use the following settings

When saving UV wires/layout templates use the following settings

Preferences - Unwrap options
If changing any of these settings, make sure to click "set as default option", to save changes

Modeling Tips
i found a youtube video that explained a lot of the information below.  I tried to locate his tutorial but was not abke to, to give him credit for this resource

Always good to model in pieces to make unwrapping easier and manageable. 

Instancing & Stitching Tool

 Some quick ways to unwrap a box.  Select all, Mapping, Flatten All.  
This will create a basic flatten texture.

Stitching tool is great to connect edges of like faces. Make sure you are in edge mode and not element mode. Right click and select Stitch Selected.

To see what edges got stitched, make sure the Box6 is white, see image below:

Stitching UVs will allow all edges to be butted up against each other to make UV’ing easier.  
The result of all edges stitched together, see below

Unfold Flat Option, helps to unfold rounded edges into a flat map, see below

Great for cylinder edges, planar edges

When selecting object, use the Detach option to separate geometry for ease on UV mapping later.  Use UVW Unwrap to create UVs for parts.
The peel option lays out rounded objects in a flattened format

Convert Edge selections to seams
Ctrl+ W - weld seems togethe

To scale all UVs equally: Use the Rescale Element Button:

To Get UVs all in the same space, use Pack Custom Options

GREAT RESOURCES
3DS Max 2018 Class #24 (UV Layout)

The larger an Island uses in a UV space, the more detail will be shown.

Small Checkers = High Quality and Large Checkers = Low Quality 


MORE RESOURCES

3DS Max 2018 Class #28 (UV Layout Options)

3DS Max 2018 Class #29 (Unwrapping a Square Table)

3DS Max 2018 Class #33 (Peel Mapping)

3DS MAX UV Mapping / Unwrapping Tutorial super fast & easy

Report

3D Studio Basics

Article / 08 January 2023

This article is from lots of different sources and has been a great reference for me to understand the technicalities of 3D modeling.  I should say Fundemantals to be successful.  This article is really the basics and hopefully more experienced modelers will add to this article.


PRIMITIVES, MESH, AND POLY MODE

Primitives are basic shapes, that you cant do much with as they stand.

Edit Poly Mode, now allows you to modify the object.
Mesh Mode. allows you to do basically the same thing, but is sort of a legacy, as in what we used to use mostly and you don’t get to use as many tools as you get with edit poly.  Most people used Edit Poly mostly.

Edit Mesh does allow you to modify hidden edges which Edit Poly doesn't allow you to do.

Working at Triangle level.  Edit Poly you work on Quads 


CTRL + Backspace to delete lines & verts
Hold down S to snap vertices together
FFD = Free Form Defamation - Box Mode

To weld 2 vertices that share the same coordinates use weld command.
Verts have to be on top of each other

Triangles & Quads
Both triangles & quads are polygons
All game engines render Triangles and not quads.
All quads are actually created by 2 triangles

Swift Loop is an excellent tool for creating divides:

We model in quads because its easier for the software to understand the mesh.  
Red one below is all in quads and the blue one is in tris.

Top of circles are called nGons and they are bad to have in the model.  Its confusing to the software.  As seen below its a mess of lines.

BACKFACE CULLING
When the system renders both sides of a polygon

Need to get in the habit of right clicking one objects and make sure Backface culling is checked

This stops the software from rendering both sides of an object.

NORMALS & FLIPPING NORMALS
To Display normals see below

To check Normals, Render a scene and all black areas displays normals facing wrong way.


EXTRUDE ALONG A CURVE
First create a cube or something

Then we need to create a line to extrude along a path

If you hold the left mouse button down, you can create curves.
Right click to end the operation

Move the line to the location you want the box to move from.

Then if you go to Interpolation, you can control the quality of the line

Select a polygon on the box

Then locate the command “Extrude Along Spline” Command:

SMOOTHING GROUPS
Helps to tell the renderer how to smooth out the edges from one polygon to the nextEdit Normal - Shows the information of each polygon

When smoothing, any angle 45 degrees or less will be smoothed together

Now that these polygons are smoothed out, the vectors between the polygons
are now sharing the space and hence the smoothness.  These polygons
are now sharing the same smoothing group.

This allows the light to be calculated correctly for each group.

RE-SETTING XFORM
We have 2 objects with their properties of x=4000, y=3000, z=3000
Now we scale the red box up and you will notice the Dimensions of the box have not changed.. This property helps reset the meshe's Axis to original location.
Will help when exporting you model to other applicationsOnce the modifier has been added the information within the scaled polygon has been updated..


EDGE REMOVAL
You can easily remove edges you down want, by using the remove command.  You don't want extra polygons that will effect performance of the gaming environment on slower devices
Bevel inside of axe using Extrude, Local Normals
Bevel inside of axe using Extrude, Local Normals Ctrl+Backspace+Delete to remove

When extruding you can use Local normals option to extrude faces local to their normals as opposed to Global Normals to get different shapeBevel inside of axe using Extrude, Local Normals

Insert Vertices Within a border. 

  1. Select a border

  2. Under Edit Borders, select Insert Vertex


Report